How to German Schmear a Brick Fireplace

Brick fireplaces are such a stand out in a home. They can add the perfect amount of character to any room, but they can often look a little outdated. That was the case with our fireplace. I absolutely love our fireplace in the center of my family room. I think the brick adds a little something to the room. But I felt like the red brick made the room look a little dark and outdated. I have wanted to German schmear this fireplace FOREVER! But every time I have even thought about it, I got way too nervous. There is no turning back from painting brick.

But last fall, I teamed up with Ace Hardware to do some home decor updates. And I felt like it was finally time to go for it!! One of the best things about Ace was that their paint person actually knew what I was talking about when I mentioned German schmear. He even gave me different options from easiest to hardest on how to achieve this look. This put my nerves at ease big time.
We ultimately decided to use mortar to German schmear our fireplace. Below I will give all our supplies and tips and tricks and things we learned along the way (and things that did NOT work!) My biggest takeaway from this project was that it was a lot easier than I anticipated.
So to get started, I highly recommend doing some research on this and finding a look you like best. I found a picture on Pinterest I loved. And I kept that pulled up on my phone all day. I even printed the photo for reference. There are a couple of different techniques with using paint or mortar or limewashing. We used mortar because we wanted it to be more rustic and rough-looking.

For supplies, we purchased the following from Ace Hardware.
6 gallons of thin-set pre-mixed mortar in white
Trowel Putty Knife (a couple of different sizes is helpful)
Grout Bag (We used a cupcake frosting bag, but this would be much better)
Drop Cloth (I recommend a big one!)
You can also find this list on my Amazon page.
When we were ready to start, we removed everything from the wall (this included the TV). We vacuumed the brick to clean off any dust. We made sure the drop cloth went all the way around the fireplace. Things get really mess with this project. But the good news is the mortar vacuums up off the carpet really well once its dry. From start to finish including prepping everything and clean up, this project took about 5 hours with two people. So be ready to put in some time.

We decided to start behind where the TV would be in case we hated it. And it let us experiment a little. So we tried putting the mortar onto the brick with the trowel. That did not work. It wouldn't "stick" to the brick. We also tried wetting a giant sponge and going over the mortar on the brick. We did not like how that looked. It made it look more like painted brick and less like the schmear look.

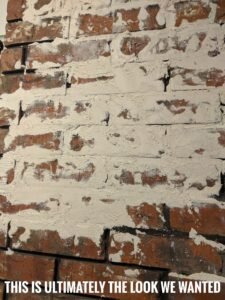
So ultimately, we ended up using the grout bag filled with mortar. We would fill the grout lines of the brick with mortar. Then we would take the trowel and schmear the mortar over the brick. It was like frosting a cake. Our grout lines were very deep between the bricks. It took a lot of mortar to fill them in. I read online it would take 3 gallons of mortar. It took us 6 gallons. We also let a lot of the red brick show through. We did not want it to be completely white.
With this blog, I will be uploading videos to my IG stories @newmexicomilkmaid. And I will save them in my Highlights under "Fireplace". Head over to my Instagram if you want a closer look at how I achieved this look. And as always feel free to leave me a question!
Udderly renovated,New Mexico Milkmaid
